How Computers Can Calculate Paychecks: A Step-by-Step Guide
Ever wondered how a computer figures out your weekly paycheck? In this post, we break it down step by step using pseudocode, a flowchart, and simple logic to show exactly how hours worked are converted into a total pay amount, including overtime.
NeanderPaul
1/25/20262 min read
Step 1: Pseudocode
START
// Step 1: Get input from the user
PROMPT "Enter the number of hours worked this week: "
READ hours_worked
// Step 2: Define hourly rates
SET regular_rate = 20
SET overtime_rate = 30
SET regular_hours_limit = 40
// Step 3: Calculate pay based on hours worked
IF hours_worked <= regular_hours_limit THEN
// Employee worked 40 hours or less
CALCULATE total_pay = hours_worked * regular_rate
ELSE
// Employee worked more than 40 hours
CALCULATE regular_pay = regular_hours_limit * regular_rate
CALCULATE overtime_hours = hours_worked - regular_hours_limit
CALCULATE overtime_pay = overtime_hours * overtime_rate
CALCULATE total_pay = regular_pay + overtime_pay
ENDIF
// Step 4: Output the total pay
DISPLAY "The total weekly paycheck is: $" + total_pay
END
...................................................................
Why does this work for the assignment rubric?
Uses keywords like START, IF, ELSE, CALCULATE, and DISPLAY
Proper indentation for readability
Covers all input possibilities (≤40 hours vs >40 hours)
Outputs a clear result
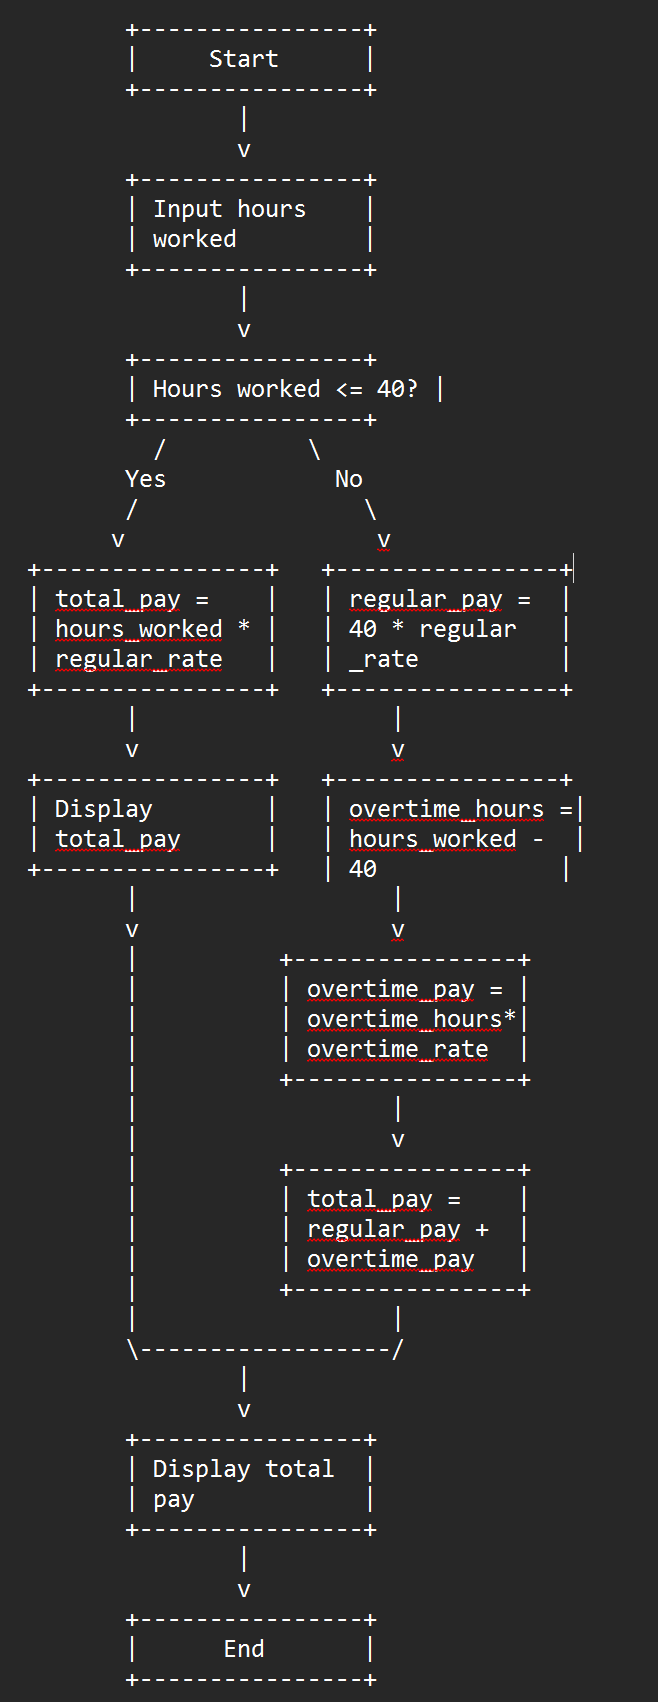
Step 2: Flowchart
The flowchart should follow these steps visually:
Start → oval symbol
Input hours worked → parallelogram symbol
Decision: hours_worked <= 40? → diamond symbol
Yes branch → multiply hours by regular rate → output total → End
No branch → calculate regular pay, calculate overtime hours, calculate overtime pay, sum/total → output total → End
Tips for making the flowchart in Word or Lucidchart:
Ovals for Start/End
Parallelograms for input/output
Diamonds for decisions (Yes/No branches)
Rectangles for processing steps
Arrows to show the flow from start → decision → calculation → output → end
Step 3: Optional Notes for Word Submission
Use 12-point Times New Roman, double-spaced, 1-inch margins
Pseudocode first, then insert the flowchart below it
Keep everything neat and readable; the rubric favors clarity
……………………………………………………………………………………………………….............................................................................................................................................................................
1.
START
The START keyword represents the beginning of the program. It tells the reader that everything that follows is part of the program’s execution. It doesn’t perform any action itself, but it helps organize the steps logically.
· 2.
Input Step
This part prompts the user to enter the number of hours they worked (hours_worked). The program reads the input and stores it in a variable for later use. This is the only information the program needs from the user to calculate pay.
· 3.
Define Hourly Rates
Here, the program sets the constants: regular_rate, overtime_rate, and regular_hours_limit. These are the company’s payment rules. Setting them in one place makes the program easy to update if the pay rates or overtime rules change.
· 4.
Decision Branch (IF/ELSE)
The IF statement checks whether the employee worked 40 hours or less. This decision determines which calculation path the program takes. If the condition is true, it uses simple calculation; if false, it applies overtime rules.
· 5.
Simple Pay Calculation (≤40 hours)
If the employee worked 40 hours or less, the program calculates total_pay by multiplying hours worked by the regular rate. This path handles the straightforward case with no overtime.
· 6.
Overtime Pay Calculation (>40 hours)
If the employee worked more than 40 hours, the program first calculates the pay for the standard 40 hours. Then it determines the number of overtime hours, calculates the overtime pay at a higher rate, and combines them to get the total pay. This ensures the employee is compensated correctly for extra work.
· 7.
Output Step
The program displays the final total_pay to the user. This is the visible result of all the calculations. Everything before this step happens “behind the scenes,” but the user only sees the total paycheck.
· 8.
END
The END keyword signals that the program has finished running. It doesn’t perform any action, but it marks the conclusion of the program logic.